Kotlin CoroutineContext

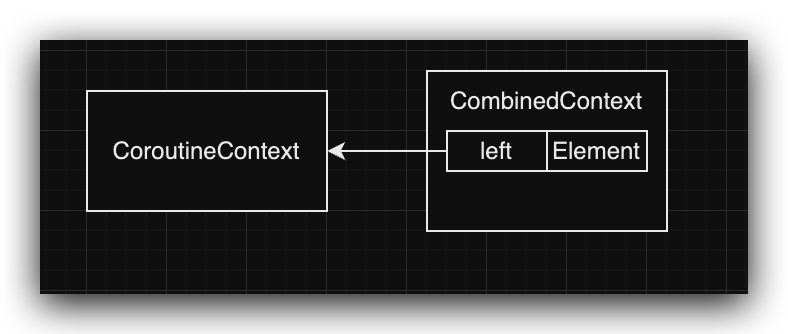
CoroutineContext 是协程中的一个重要概念,我们可以通过它来调度协程执行、进行异常处理、跟踪协程层级关系以及携带协程作用域信息。本文通过启动协程的源码,尝试分析其数据结构以及传递机制。

阅读更多

KSP

Kotlin 符号处理(KSP)是一种 API,您可以用它来开发轻量级编译器插件。KSP 提供了一个简化的编译器插件 API,可充分利用 Kotlin 的强大功能,同时将学习曲线保持在最低水平。与 kapt 相比,使用 KSP 的注释处理器运行速度最多可提高两倍。

阅读更多

Kotlin与DataBinding协作

DataBinding 是 Google 爹地为我们这群苦逼的 Android 开发者推出的 MVVM 框架。本文解决 Kotlin 和 DataBindin 共用时报错的问题。

如下修改即可

app 的 build.gradle 中添加如下部分

1
2
3
4
5
6
7
dependencies {
// ...
kapt 'com.android.databinding:compiler:1.0-rc5'//改为对应版本
}
kapt {
generateStubs = true
}

Kotlin中的委托属性

Kotlin 是 Jetbrain 推出的一门运行在 JVM 上的语言,它结合了面向对象以及函数式语言的特性,超甜的语法糖以及来自知名 IDE 大厂 Jetbrain 的出身让它初一面世就广受瞩目,特别是在 Android 开发社区中。它相比起 Java 拥有了许许多多的优秀特性,并且几乎每一个新特性都对应解决了 Java 开发时的痛苦之处,本篇文章主要讲解 Kotlin 中的委托属性这一特性。

委托属性(Delegated Properties)

我们先看看官网的定义:

有一些种类的属性,虽然我们可以在每次需要的时候手动实现它们,但是如果能够把他们之实现一次 并放入一个库同时又能够一直使用它们那会更好。例如:

  • 延迟属性(lazy properties): 数值只在第一次被访问的时候计算。
  • 可控性(observable properties): 监听器得到关于这个特性变化的通知,
  • 把所有特性储存在一个映射结构中,而不是分开每一条。

为了支持这些(或者其他)例子,Kotlin 采用 委托属性。

简言之就是简化手动实现的属性,将其抽象出一个库

如何使用

定义一个委托

Kotlin 中有两种属性:用var修饰的可变属性和由val修饰的只读属性。由val修饰的只读属性使用的委托需要实现ReadOnlyProperty,而var修饰的可变属性则需要实现ReadWriteProperty

在调用被委托的属性的gettersetter时,对应操作会被委托给getValue()以及setValue()

如实现一个最简单的委托Delegate

1
2
3
4
5
6
7
8
9
class Delegate {
operator fun getValue(thisRef: Any?, property: KProperty<*>): String {
return "$thisRef, thank you for delegating '${property.name}' to me!"
}

operator fun setValue(thisRef: Any?, property: KProperty<*>, value: String) {
println("$value has been assigned to '${property.name} in $thisRef.'")
}
}

使用定义好的委托属性

语法为val/var <property name>: <Type> by <expression>

1
2
3
class Example {
var p: String by Delegate()
}

by后面的是委托表达式,我们调用这个对象并使用属性:

1
2
3
4
val e = Example()
println(e.p)

e.p = "NEW"

打印结果为:

1
2
Example@33a17727, thank you for delegating 'p' to me!
NEW has been assigned to 'p' in Example@33a17727.

如上可知,thisRef对应的是拥有该被委托属性的对象实例,property则是属性,value是调用setter时的传入值。

实例讲解

lazy 懒加载

Kotlin 标准库自带的懒加载委托,在属性第一次被使用时才进行初始化。

函数lazy()接受一个 lambda 然后返回一个可以作为委托Lazy<T> 实例来实现延迟属性: 第一个调用getter执行变量传递到lazy()并记录结果, 后来的getter调用只会返回记录的结果。

1
2
3
4
5
6
7
8
9
val lazyValue: String by lazy {
println("computed!")
"Hello"
}

fun main(args: Array<String>) {
println(lazyValue)
println(lazyValue)
}

其打印结果:

1
2
3
computed!   # 第一次使用时先初始化
Hello # getter
Hello # 后续都只会调用 getter

懒加载委托在实际编码中应用十分广泛,比如 Android 中我们可以把很多在OnCreate中需要进行的初始化操作使用懒加载委托来实现。

使用委托操作 SharedPreferences

本例出自《Kotlin for Android Developer》,使用了when表达式和委托属性巧妙地使得SharedPrefences的读写变得十分简便

1
2
3
4
5
6
7
8
9
10
11
12
13
14
15
16
17
18
19
20
21
22
23
24
25
26
27
28
29
30
31
32
33
34
35
36
class Preference<T>(val context: Context, val name: String, val default: T) : ReadWriteProperty<Any?, T> {

val prefs by lazy { context.getSharedPreferences("default", Context.MODE_PRIVATE) }

override fun getValue(thisRef: Any?, property: KProperty<*>): T {
return findPreference(name, default)
}

override fun setValue(thisRef: Any?, property: KProperty<*>, value: T) {
putPreference(name, value)
}

private fun <U> findPreference(name: String, default: U): U = with(prefs) {
val res: Any = when (default) {
is Long -> getLong(name, default)
is String -> getString(name, default)
is Int -> getInt(name, default)
is Boolean -> getBoolean(name, default)
is Float -> getFloat(name, default)
else -> throw IllegalArgumentException("This type can be saved into Preferences")
}

res as U
}

private fun <U> putPreference(name: String, value: U) = with(prefs.edit()) {
when (value) {
is Long -> putLong(name, value)
is String -> putString(name, value)
is Int -> putInt(name, value)
is Boolean -> putBoolean(name, value)
is Float -> putFloat(name, value)
else -> throw IllegalArgumentException("This type can be saved into Preferences")
}.apply()
}
}

在代码中我们可以如下使用

1
2
3
4
5
6
7
8
class WhateverActivity : Activity() {
var aInt: Int by Preference(this, "aInt", 0)

fun whatever() {
println(aInt) // 会从 SharedPreference 取这个数据
aInt = 9 // 会将这个数据写入 SharedPreference
}
}

从此操作SharedPreferences变得如此简单 ~

简单实现一个 KotterKnife

KotterKnife 是一个 Android 控件依赖注入框架,使用它可以很方便地初始化 Activity、Fragment、View 等的控件。

KotterKnife 的实现原理就是使用了委托属性,下面我就使用委托属性简单实现一个 View 注入功能

实现

我们平时是这样初始化 View 的

1
2
3
4
5
6
override fun onCreate(savedInstanceState: Bundle?) {
super.onCreate(savedInstanceState)
setContentView(R.layout.activity_main)

val textView = findViewById(R.id.text_view) as TextView
}

考虑到通常我们在onCreate方法中将其初始化,我们可以用 lazy 委托,在第一次使用该控件的时候才将其初始化,这样可以减少不必要的内存消耗。

1
2
3
val mTextView by lazy {
findViewById(R.id.text_view) as TextView
}

对其抽取简化

1
2
3
4
5
6
7
@Suppress("UNCHECKED_CAST")
fun <V : View> Activity.bindView(id: Int): Lazy<V> = lazy {
viewFinder(id) as V
}

private val Activity.viewFinder: Activity.(Int) -> View?
get() = { findViewById(it) }

之后我们就可以在 Activity 中这样注入 View 了

1
val mTextView by bindView<TextView>(R.id.text_view)

如上实现了类似 KotterKnife 的控件注入功能,当然 KotterKnife 中还有更加强大的可选绑定以及数组绑定,本文中我们就不细说了,有兴趣的读者可以阅读 KotterKnife源码

小结

本文分析了 Kotlin 中的委托属性,并对其实际应用做了示例分析。委托属性是 Kotlin 语言的一个特性,灵活使用可以解决实际编码中的许多问题,减少大量重复代码,而由于其与属性的gettersetter直接绑定所以使用起来也十分灵活方便。

总而言之:这真是极好的

Kotlin中实现Parcelable

在Android中,如果需要序列化对象可以选择实现 SerializableParceable。如果是在使用内存的情况下,Parcelable 的效率比 Serializable 高。但 Parcelable 不能被持久化存储,此时还是需要实现 Serializable

Java实现

首先我们看一个普通的 JavaBean

1
2
3
4
5
6
7
8
9
10
11
12
13
14
15
16
17
18
19
20
21
22
23
24
25
26
27
28
29
30
31
32
33
34
35
/**
* 帖子实体类
* <p/>
* Created by Loshine on 15/9/8.
*/
public class PostEntity {

/**
* 帖子标题
*/
private String name;
/**
* 帖子类别
*/
private String category;
/**
* 帖子链接
*/
private String link;
/**
* 评论数
*/
private String comments;
/**
* 发布者
*/
private String announcer;
/**
* 最新回复时间
*/
private String replyTime;

/*
* 省略 getter setter...
*/

其中的代码都是 JavaBean 的属性以及 gettersetter

如果其实现 Parcelable,则是这样的

1
2
3
4
5
6
7
8
9
10
11
12
13
14
15
16
17
18
19
20
21
22
23
24
25
26
27
28
29
30
31
32
33
34
35
36
37
38
39
40
41
42
43
44
45
46
47
48
49
50
51
52
53
54
55
56
57
58
59
60
61
62
63
64
65
66
67
68
69
70
71
72
/**
* 帖子实体类
* <p/>
* Created by Loshine on 15/9/8.
*/
public class PostEntity implements Parcelable {

/**
* 帖子标题
*/
private String name;
/**
* 帖子类别
*/
private String category;
/**
* 帖子链接
*/
private String link;
/**
* 评论数
*/
private String comments;
/**
* 发布者
*/
private String announcer;
/**
* 最新回复时间
*/
private String replyTime;

/*
* 省略 getter setter...
*/

@Override
public int describeContents() {
return 0;
}

@Override
public void writeToParcel(Parcel dest, int flags) {
dest.writeString(this.name);
dest.writeString(this.category);
dest.writeString(this.link);
dest.writeString(this.comments);
dest.writeString(this.announcer);
dest.writeString(this.replyTime);
}

public PostEntity() {
}

protected PostEntity(Parcel in) {
this.name = in.readString();
this.category = in.readString();
this.link = in.readString();
this.comments = in.readString();
this.announcer = in.readString();
this.replyTime = in.readString();
}

public static final Parcelable.Creator<PostEntity> CREATOR = new Parcelable.Creator<PostEntity>() {
public PostEntity createFromParcel(Parcel source) {
return new PostEntity(source);
}

public PostEntity[] newArray(int size) {
return new PostEntity[size];
}
};

在实现Parcelable的时候我们需要重写两个方法

  • public void writeToParcel(Parcel dest, int flags)
  • public int describeContents()

其中describeContents只需要返回 0 即可

writeToParcel方法中我们把需要序列化的属性使用writeXXX的方式写入 Parcel

之后是 CREATOR 对象,这个对象负责从 Parcel 中读取对象,所以我们需要重写其方法来读取对象

1
2
3
4
5
6
7
8
9
10
11
12
13
14
15
16
17
18
protected PostEntity(Parcel in) {
this.name = in.readString();
this.category = in.readString();
this.link = in.readString();
this.comments = in.readString();
this.announcer = in.readString();
this.replyTime = in.readString();
}

public static final Parcelable.Creator<PostEntity> CREATOR = new Parcelable.Creator<PostEntity>() {
public PostEntity createFromParcel(Parcel source) {
return new PostEntity(source);
}

public PostEntity[] newArray(int size) {
return new PostEntity[size];
}
};

这一段就是其实现方式,可见主要是将对象从 Parcel 中读取出来。

Kotlin实现

看过了冗长的 Java 实现方式,我们来看看kotlin是如何实现的吧。

首先使用插件将其转换为 Kotlin 文件,并修改其中的错误

1
2
3
4
5
6
7
8
9
10
11
12
13
14
15
16
17
18
19
20
21
22
23
24
25
26
27
28
29
30
31
32
33
34
35
36
37
38
39
40
41
42
43
44
45
46
47
48
49
50
51
52
53
54
55
56
57
58
59
60
61
62
63
64
65
66
class PostEntity : Parcelable {

/**
* 帖子标题
*/
var name: String? = null
/**
* 帖子类别
*/
var category: String? = null
/**
* 帖子链接
*/
var link: String? = null
/**
* 评论数
*/
var comments: String? = null
/**
* 发布者
*/
var announcer: String? = null
/**
* 最新回复时间
*/
var replyTime: String? = null


override fun describeContents(): Int {
return 0
}

override fun writeToParcel(dest: Parcel, flags: Int) {
dest.writeString(this.name)
dest.writeString(this.category)
dest.writeString(this.link)
dest.writeString(this.comments)
dest.writeString(this.announcer)
dest.writeString(this.replyTime)
}

constructor() {
}

protected constructor(`in`: Parcel) {
this.name = `in`.readString()
this.category = `in`.readString()
this.link = `in`.readString()
this.comments = `in`.readString()
this.announcer = `in`.readString()
this.replyTime = `in`.readString()
}

companion object {

val CREATOR: Parcelable.Creator<PostEntity> = object : Parcelable.Creator<PostEntity> {
override fun createFromParcel(source: Parcel): PostEntity {
return PostEntity(source)
}

override fun newArray(size: Int): Array<PostEntity?> {
return arrayOfNulls(size)
}
}
}
}

这就是 Kotlin 实现 Parcelable 的方式了

优化

经过插件转化的 kotlin 代码其实使用的还是 java 的方式和 java 的思想,我们可以将其完全转化为 kotlin 的方式并对其优化

首先把其转化为数据类,这样会自动为我们生成

  • equals()/hashCode()
  • toString()
  • componentN()
  • copy()

我们只需要将其改为这样

1
2
3
4
5
6
7
8
9
10
11
12
13
14
15
16
17
18
19
20
21
22
23
24
25
26
27
28
29
30
31
32
33
34
35
36
37
38
39
40
41
42
43
data class PostEntity(var name: String? = null, /* 帖子标题*/
var category: String? = null, /* 帖子类别 */
var link: String? = null, /* 帖子链接 */
var comments: String? = null, /* 评论数 */
var announcer: String? = null, /* 发布者 */
var replyTime: String? = null /* 最新回复时间 */
) : Parcelable {

override fun describeContents(): Int {
return 0
}

override fun writeToParcel(dest: Parcel, flags: Int) {
dest.writeString(this.name)
dest.writeString(this.category)
dest.writeString(this.link)
dest.writeString(this.comments)
dest.writeString(this.announcer)
dest.writeString(this.replyTime)
}

protected constructor(`in`: Parcel) : this() {
this.name = `in`.readString()
this.category = `in`.readString()
this.link = `in`.readString()
this.comments = `in`.readString()
this.announcer = `in`.readString()
this.replyTime = `in`.readString()
}

companion object {

val CREATOR: Parcelable.Creator<PostEntity> = object : Parcelable.Creator<PostEntity> {
override fun createFromParcel(source: Parcel): PostEntity {
return PostEntity(source)
}

override fun newArray(size: Int): Array<PostEntity?> {
return arrayOfNulls(size)
}
}
}
}

再之后观察发现,所有的 Parcelable 都需要有一个 CREATOR

1
2
3
4
5
6
7
8
9
10
11
12
companion object {

val CREATOR: Parcelable.Creator<PostEntity> = object : Parcelable.Creator<PostEntity> {
override fun createFromParcel(source: Parcel): PostEntity {
return PostEntity(source)
}

override fun newArray(size: Int): Array<PostEntity?> {
return arrayOfNulls(size)
}
}
}

此处使用了 Kotlin伴生对象,使得调用 CREATOR 类似于 Java 中的静态属性

可以使用 Kotlin 的函数式编程特性抽取

新建文件ParcelableExt.kt

1
2
3
4
5
public inline fun createParcel<reified T : Parcelable>(crossinline createFromParcel: (Parcel) -> T?): Parcelable.Creator<T> =
object : Parcelable.Creator<T> {
override fun createFromParcel(source: Parcel): T? = createFromParcel(source)
override fun newArray(size: Int): Array<out T?> = arrayOfNulls(size)
}

此处使用了 Kotlin 的内联函数,然后我们就可以将 PostEntity 精简为如下

1
2
3
4
5
6
7
8
9
10
11
12
13
14
15
16
17
18
19
20
21
22
23
24
25
26
27
28
29
30
31
32
33
34
data class PostEntity(var name: String? = null, /* 帖子标题*/
var category: String? = null, /* 帖子类别 */
var link: String? = null, /* 帖子链接 */
var comments: String? = null, /* 评论数 */
var announcer: String? = null, /* 发布者 */
var replyTime: String? = null /* 最新回复时间 */
) : Parcelable {

override fun describeContents(): Int {
return 0
}

override fun writeToParcel(dest: Parcel, flags: Int) {
dest.writeString(this.name)
dest.writeString(this.category)
dest.writeString(this.link)
dest.writeString(this.comments)
dest.writeString(this.announcer)
dest.writeString(this.replyTime)
}

protected constructor(`in`: Parcel) : this() {
this.name = `in`.readString()
this.category = `in`.readString()
this.link = `in`.readString()
this.comments = `in`.readString()
this.announcer = `in`.readString()
this.replyTime = `in`.readString()
}

companion object {
val CREATOR = createParcel { PostEntity(it) }
}
}

总结

虽然可以直接将 Java 文件转化为 Kotlin 文件,但这样毕竟没有办法学习到 Kotlin 的精髓

使用一门语言就应该按照这门语言的编码风格以及规范去实现,这样才会让我们的学习更加有效率且养成良好的编码习惯

Kotlin 是一门典型的函数式编程语言,学习它的风格有利于我们了解函数式编程思想

在实现 Parceable 时我们使用了 Kotlin 的几个特性

  • 数据类
  • 二级构造函数
  • 内联函数

查阅官方文档完成的同时我也学会了新的姿势知识,想一想也有点小激动呢